|
|
|
|
|
| Buddhism | Christianity | Hinduism | Islam | Mormon | Muslim | Religions | Spirituality | My Way! | Unify | Poll/Rank | Simple hack that a basic computer user can perform that makes internet connection lightening fast!
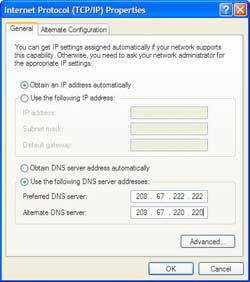
Here's the simplest way to hack DNS to speed up your Web browsing: Use free, superfast DNS servers run by the OpenDNS service or by using Googles DNS instead of your ISP's DNS servers. OpenDNS as well as Google have a monstrously big DNS cache, with DNS servers around the world, so you'll be able to retrieve IP addresses from it more quickly than from your ISP's DNS servers. As I'll explain a little later in this article, the service includes other benefits as well, such as letting you create browser shortcuts so that you could go to www.computerworld.com, for example, by just typing the letter c in your browser and pressing Enter.The addresses of the OpenDNS servers are 208.67.222.222 for a primary DNS server and 208.67.220.220 for a secondary server (For Google DNS servers use 8.8.8.8 as the primary and 8.8.4.4 as the secondary). To use the either DNS servers, you'll have to tell your computer to use them. If you have Windows XP, first select Control Panel --> Network and Internet Connections --> Network Connections, right-click your network connection from the Network Connections window, and select Properties. A dialog box like that shown below appears. 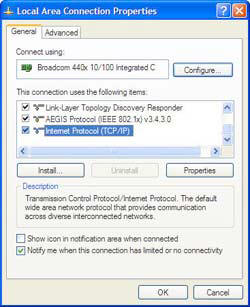 Highlight the Internet Protocol (TCP/IP) listing and select Properties in order to get to a dialog box that will let you use OpenDNS server. Scroll down to the Internet Protocol (TCP/IP) listing and select Properties. At the bottom of the screen, select "Use the following DNS server addresses." For the Preferred DNS server, enter this address: 208.67.222.222. For the Alternative DNS server, enter this address: 208.67.220.220. Click OK, and then click Close and Close again. Restart your PC in order for the settings to take effect. The figure below shows the screen filled out properly.
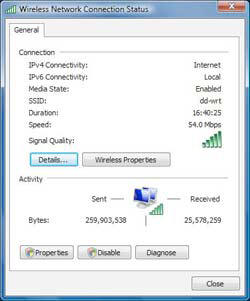
Telling your PC to use the OpenDNS servers. If you're using Windows Vista, select Control Panel --> Network and Internet --> Network and Sharing Center. Click the View Status link on the right side of the screen. The Local Connection Status screen appears, as shown in the figure below. Click Properties.
Click Properties in order to get to a dialog box that will let you use OpenDNS servers. You'll come to the same dialog box as you would for XP that lets you use the OpenDNS servers. Follow the same directions as for using OpenDNS on XP, and you'll be set. When you configure a PC to use OpenDNS, only that PC will be able to use the OpenDNS servers. If you want all of the PCs on your network to use the servers, you can tell your router to use the OpenDNS servers, and then all of your PCs on the network will follow suit. That way, you won't have to configure each individual PC. The way you do this will vary from router to router, and it changes according to whether you're using a router for a home office/small office or a larger corporate router. For a small office/home office router, you'll log into your router, look for the DNS settings, and then use the OpenDNS settings of 208.67.222.222 for the primary DNS server and 208.67.220.220 for the alternative DNS server.Whether you run a small network or larger network, you can get benefits beyond faster DNS. The service also gives you DNS management tools such as domain blocking. It also gives you statistics and charts about your network's DNS use. |
||